 Current trend in DIY is IoT based projects. The present professional electronics engineering industry is also now focusing to IoT.There are many existing protocols are there for making connection with your device with Web.If we need real time data in every second or less than that,We will need a fast internet connectivity protocol.And it should use very little bandwidth.Here we have MQTT.
MQTT is an extreamly light weight connectivity protocol which is mainly used for machine to machine /IoT applications.It was formerly known as MQ Telemetry Transport.it is a publish/subscribe based messaging protocol for use on the top of TCP/IP protocol.MQTT is very helpful where network bandwidth is limited.Many IoT companies uses MQTT for their applications.
There are several MQTT brokers are available In this example we are using mosquitto broker.In MQTT there is several methods are defined like
1.Connect
2. Disconnect
3.Subscribe
4.Unsubscribe
5.Publish
As DIY hackers we also make use of MQTT in our projects .Many of the boards supporting WiFi is also supports MQTT.Here I am going to discribe MQTT broker in Raspberry Pi.And MOTT Client in Raspberry Pi,Particle Photon,esp8266.
I have no plan to explain the MQTT protocol ,but i would like to explain how it can be implemented in our DIY project.In MQTT protocol we will have broker and clients.clients are those which can publish and subscribe to some topics created in broker.Broker is responsible for all fitering and all.ie broker will receive all messages and it will send those messages to corresponding subscribed clients.MQTT client libraries are easly available for many devices and in many coding languages.
It is very easy to set up a MQTT broker in linux system.As this blog is mainly explaining DIY projects I would like to Explain how to install MQTT broker in Raspberry Pi,which is one of the best toy of an electronics hobbyists.And I will be sharing how to set up MQTT clients(publish/subscribe) in Raspberry pi, Particle photon,esp8266,which are main tools in IoT hardware prototyping.All these are inspired from community.So I would like to thank all bloggers in community.
First we can Setup a MQTT broker in our Raspberry pi.For installing Mosquitto broker follow the steps below.
How to install MQTT broker in Raspberry pi
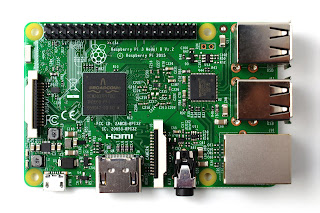 First we have to import repository package for mosquitto into our raspberry pi.For that open the Raspberry pi terminal and run below commands.I used a Raspberry Pi 3 in jessie with 16GB microSD card
sudo apt-key add mosquitto-repo.gpg.key
Now we have to make available this repository to apt by using below command
cd /etc/apt/sources.list.d/
Now follow below commands
sudo -i
for updating pi
sudo apt-get update
apt-get update
After updating we can install mosquitto MQTT broker running below command
apt-get install mosquitto
How to install MQTT Client in Raspberry pi
So now we successfully installed MQTT broker in our Raspberry Pi.Now we can install MQTT client by below command
 apt-get install mosquitto-clients
Now the client library for MQTT is installed
So we successfully installed MQTT.Now we can start publishing and subscribing to some topics.
How to use MQTT client as Publisher
To publish a data “wiring_it _my _way ” to a topic named “color”we can use the below commands
If the broker is installed in the same Raspberry pi
mosquitto_pub -h localhost -t color -m wiring_it_my_way
If the broker is installed in different Raspberry pi
mosquitto_pub -h 192.168.0.114 -t value -m wiring_it_my_way
How to use MQTT client as Subscriber
If the broker is installed in a different system then for subscribing a topic named “color” just run the below command
mosquitto_sub -h 192.168.0.114 -t color
Here the IP in the command is lP of broker raspberry pi/system
if the client is running in the same raspberry pi where broker is installed then use the below command for subscribing a topic named “color”
mosquitto_sub -h localhost -t color
ESP8266 as MQTT client
As we know ESP8266 WiFi Module is a self contained SOC with integrated TCP/IP protocol stack that can give any micro controller access to our WiFi network.Also we can program the ESP8266 directly from our arduino IDE.There many libraries available for ESP8266 in the community.I am sharing two code snippets .One is for publishing using ESP8266 and the other is for publishing and subscription.
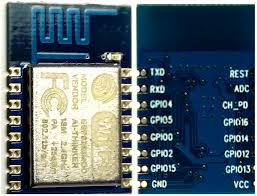 Here our broker is set upped in raspberry pi so we have to note the IP of the raspberry pi and include in our ESP8266 arduino code.
Here given code is only basic code please make your own variety with sensors and actuators have fun.And please share in comments I used an ESP8266-12


Particle Photon as MQTT client
In one of my previous post we have discussed about the particle module,which is one of the best choice for IoT based prototyping.Particle web IDE contains MQTT libraries in it.By including those libraries we can easly subscribe or publish to a MQTT topic.Here also we have to give IP address of our pi in Particle code. .
 // This #include statement was automatically added by the Particle IDE.

#include "MQTT/MQTT.h"


// This #include statement was automatically added by the Particle IDE.

#include "MQTT/MQTT.h"


#include "MQTT/MQTT.h"

String sensor;

byte server[] = { 192,168,0,115 };//the IP of broker

void callback(char* topic, byte* payload, unsigned int length);

MQTT client(server, 1883, callback);


void callback(char* topic, byte* payload, unsigned int length) {

    char p[length + 1];

    memcpy(p, payload, length);

    p[length] = NULL;

    String message(p);


    if (message.equals("RED"))

        RGB.color(255, 0, 0);


    else if (message.equals("GREEN"))

        RGB.color(0, 255, 0);

    else if (message.equals("BLUE"))

        RGB.color(0, 0, 255);

    else if (message.equals("wiring_it_my_way"))

        {RGB.color(255, 0, 0);

        delay(1000);

        RGB.color(0, 255, 0);

        delay(1000);

        RGB.color(0, 0, 255);

        delay(1000);}

    else

        RGB.color(255, 255, 255);

    delay(1000);

}


void setup() {

    pinMode(A0,INPUT);

    RGB.control(true);

    client.connect(System.deviceID());

    if (client.isConnected()) {

        client.subscribe("color");//color is the topic that photon is subscribed

        client.publish("fun", "hello");//publishing a data "hello" to the topic "fun"


    }

}


void loop() {

    int sensor_value =analogRead(A0);

    sensor =String (sensor_value);

    if (client.isConnected())

        client.loop();

         client.publish("value", sensor);//publishing a sensor data  to the topic "value"


}
w
hen i heard the name MQTT for the first time i thought it will be very difficult for a hardware geek like me.But the broker set up was very easy and straight forward.It makes MQTT very easy.Regarding quality there are methods in MQTT to retain messages,confirmation etc.I don't have a plan to explain those in this post.Now make your own project in MQTT in whichever platform you like and please let me know your ideas in comments.
you can find the hackster project here
 Wire up your particle photon as shown in the above circuit.Then open particle Web IDE and upload the below code to your photon.The code is simple it is just publish an event which is publishing the analog voltage on pin A0 in every 1 minute.
 Now we can create new integration .For that select new integration in console and select webhook
 You can see the above screen.Now we have to create a channel in thingspeak and fill the data to above form.Now open thingspeak and create a new account if you are new to thingspeak .Then create a new channel and note the channel API


 You can also embed the graph in your site also.


